How to Change an input’s HTML5 placeholder color with CSS?
A placeholder in input field looks like this: By default the color of the placeholder is black (with some opacity).
In order to change the default color of a placeholder in input field, we can use pseudo-elements and pseduo-classes. Mozilla Firefox
/* Mozilla Firefox 4 to 18 */
[one colon]
:-moz-placeholder {
color: #909;
opacity: 1;
}
/* Mozilla Firefox 19 & above */
::-moz-placeholder {
color: #909;
} Webkit Browsers
/*Chrome,Safari,etc*/
::-webkit-input-placeholder {
color: #909;
} Internet Explorer
/* IE 10+ */
:-ms-input-placeholder {
color: #909;
} Points to Note:
IE 9 & Below and Opera 12 & below do not support any CSS selector for placeholders.
Firefox’s placeholder needs to use opacity: 1 to avoid any default contrasts.
It is highly recommended to use em’s for input elements’ dimensions to avoid any cutoff in placeholder’s text.
Call( ) and Apply( ) in JS is most commonly used to invoke a method or used in constructors & classes for Inheritance purposes.
The first parameter to be passed in these two methods is an Object (current reference/current context). The difference comes in the concluding parameters.
Apply( ) takes Array as it’s next parameter. The array represents the arguments for the target method.
Call( ) takes arguments in comma separated format.
Usage:
Use apply ( ), if you don’t know the number of arguments you will be passing, or if they are already in an array.
With call ( ), you can write a method once and then inherit it in another object, without having to rewrite the method for the new object.
Unit Testing has moved from fringe to mainstream, which is great. It’s taken quite a while around the idea that unit testing is a necessity for most of today’s projects. Unit testing is the ultimate in assessing functionality of each unit while the application is being built. This helps prevent future errors by identifying and developing end-to-end test scenarios, ensuring the correctness of functionality as per business requirements.
Testing the final version of product or website can give errors that are difficult to solve.Therefore the best approach is to divide the software in elements
with different units and test them from the smallest to the biggest. Unit test allows developers to make big changes to code quickly. Most unit tests are written using some sort of test framework, a set of library code designed to make writing and running tests easier. But all you need is to choose the right tool that is specific to your platform and script based tools. Most popular JS test tools used by developers include:
qUnit - It is the oldest and it’s seen popular use in jQuery. Lots of support across the board, from Q&A to CI server support. It lacks fluent syntax and configuration
is complex. Makes 3rd party libraries relatively difficult.
Jasmine - It’s built to be easy to set up and use in almost any scenario. It has nice fluent syntax for assertions built-in, and does play pretty well with other assertion libraries. Supported by many CI servers. Asynchronous testing can be a bit of a headache. Expects a specific suffix to all test files (*spec.js by default).
Mocha - Built specifically for testing nodeJs modules. Its API is similar to that of Jasmine’s, with a bit of syntactic sugar added to make it more conductive to a wider range of scenarios, such as BDD. It has its own test runner baked in, so that’s a concern you should never have to worry about.
It also, unlike Jasmine, has really nice support for testing asynchronous methods. Allows use of any assertion library that will throw exceptions on failure. Supported by some CI servers and plugins.
Advantages:
Early detection and resolution of problem: Developers test individual units and resolve the problems without any impact of any other code. Through Unit testing, problems can be detected and resolved in early stage and save valuable time in entire software development life cycle.
Debugging Process: Unit testing makes debugging process very simple as only the latest changes made in the unit needs to be debugged in case of a test failure. Simplified Integration: Unit testing is advised to be used in bottom up testing method as it generally reduces the uncertainty within the unit itself, hence makes the integration easier.
Easy maintenance and changing of code: As independent and smallest units are tested, impacts of changes of other units/codes are less. Once the tests are completed, and bugs are fixed, same units can be reused.
Reusability of Codes: Codes need to be developed in modular form to perform unit testing. Modular codes are easier to reuse both for the same as well as any other projects.
Faster Development: Unit testing allows faster code development to the developer as they can write as well as test the code of their own instead of depending on “Developer’s test”. It helps to fix the bugs early.
Increases Confidence: Unit testing helps to increase developers confidence in terms of changing as well as maintaining code. Good unit tests are capable to catch all the errors that are caused because of the change in codes and help to fix it faster.
Disadvantages:
Time consuming: It can make the development of any application a long process because testing each unit takes time.
Thorough documentation: It requires thorough documentation. If the developer does not meet the criteria, then unit testing is going to be a waste of time. Many developers and programmers tend to rush and are impatient and this is a common reason why unit testing is never done and many applications never become productive.
Conclusion: Unit testing is a good approach to keep code maintainable, understandable, debuggable, and bug-free. Good unit tests make it possible to improve the production code. One can confidently refactor the system until the code is good. Direct benefits like cost, time and effort contributes most for the reasons behind the gaining popularity of unit test which is the leading trend in current software industry.
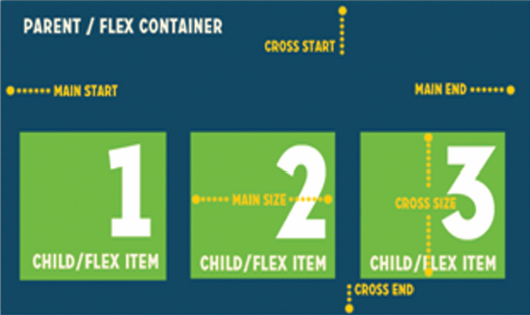
Flexbox is entirely new collection of CSS properties that lets developers to generate flexible layouts with just few lines of code.
Flexbox reacts same as its name. Flexbox provides block level arrangement of parent and child elements that are flexible to adapt to display size. This is an exciting concept of developing complex block model which lack flexibility especially on large scaled application with orientation changes, resizing, stretching, shrinking. Indeed, lots of developers found Flexbox model easy to use.
The fundamental concept of flex layout is to provide ability to alter its items width and/or height to best fill the available space on any display device. A flex container expands items to fill available free space or shrinks them to prevent overflow. Flexbox property is supported by all latest versions of modern browsers Google Chrome 29.0 +, IE 11, FF 28.0 +, Safari 6.1 & Opera 12.10.
“Flexbox child elements can be positioned in any specific direction and can have flexible dimensions to adjust to the display area. Positioning child elements is thus much easier, and complex layouts can be achieved more simply with cleaner code.“
Now designers can manipulate the direction, alignment, and spacing of page elements with display:flexbox method. Properties such as Display: flex, flex-direction, justify-content flex-grow, etc allows developers to make consistent height for flex items. There are many spacing choices for flex items within the flexbox, both horizontally and vertically.
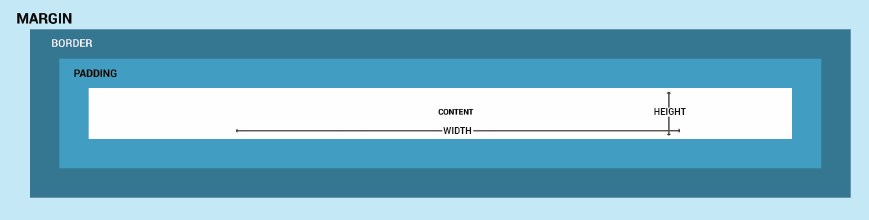
Spotlight on Box Model:
CSS Box Model has important components that essentially wrap the content area in the so-called box. Box Model is made up of 4 distinct parts Content, Padding, Border and Margin that interact with each other to form a box and calculates space of a block-level element that it takes up. Below you can see a schematic view of the CSS Box Model.
Few important properties that you will need for the box model are display: box, box-align, box-pack, box-flex, box-ordinal-group, and box-orient. The CSS3 box-sizing property allows you to specify the box model with values content-box | border-box | inherit. You can specify a border/padding value in relation to a fluid length element with the ‘box-sizing’ property that is supported by all major browsers.
This box model is extremely effective when you have two equal columns. If you provide them 50% width each and add some padding and maybe a border, the columns won’t show up side by side. This is an ideal scenario where you can set box-sizing to border-box and happily set the width to 50% for both boxes.
Now let’s have a look at how they differ:
Flexbox
It is direction agnostic and is ideally suited for aligning its contents in ways that Web apps and complex Web pages often need. By using flexbox, we can control row widths, column widths and column re-ordering on the screen.
Most appropriate for the components of an application and small-scale layouts.
Flexbox is not supported in IE and Safari. They are available in newer versions of Firefox(18.0 -moz) and Opera(12.10) and Chrome (21.0 – webkit). For modern browsers you should get a long way using flexbox standard syntax with the “-webkit-” vendor prefix added in.
Elements in page behave predictably when accommodating different screen sizes and different display devices.
Works well for responsive websites when combined with other technologies such as Media Queries.
Box model
It works well for pages by giving basic floating positions, it lacks support to application components that have to change orientation, resize, stretch, or shrink as the user changes, flips from vertical to horizontal, and so forth.
It is intended for larger scale layouts.
All major browsers support it, except IE7. Currently, Firefox is the only browser that needs a vendor prefix, so make sure to also include the “-moz-” prefixed declaration.
As you can see, Flexbox has great potential to make our lives so much easier if we need to set up a layout for a website. The bottom line is that both flexbox and box model radically change the way we approach layout and build websites. The properties both of these have flip our CSS approach on its head and makes us consider layout from a logical perspective.
AngularJS 1.3 is the best version of Angular as of yet, it introduced a lot of awesome features with substantial performance and speed improvements. But Angular was not the same as it is today. The framework changed in the meantime to keep up with the ever changing web, and developers started picking it up too and more complex applications started being created. It has undergone significant changes from version 1.3 to 2.0 to improve almost every single part of AngularJS. Angular 2.0 was officially announced at the ng-conference. This version is being rewritten from scratch to take advantage of new browser features and integrate lessons learned from Angular up to this point.
Let’s take a closer look at the above example. You no longer see ng-model and ng-click in Angular 2.0, rather it uses square bracket notation. Just like in JavaScript, Angular 2.0 will also use parentheses to invoke methods.
New things in Angular 2.0
a) AtScript
AtScript is a language that is a superset of ES6 and it’s being used to author Angular 2.0. It uses TypeScript’s type syntax to represent optional types which can be used to generate runtime type assertions, rather than compile-time checks. It also extends the language with metadata annotations.
b) Child Injectors
Angular 2.0 has other new things to offer like CHILD INJECTORS. As name suggests child injector will inherit services from parents and moreover it will also have the ability to change them. Woaahh!! Pretty Powerful child!
c) Dynamic Loading
One main issue with angular 1.3 was developers weren’t able to easily add new feature (controller or directive) on the fly. But in Angular 2.0 everything is designed from scratch with asynch.
d) Directives
In Angular 2.0 there are three types of directives:
Component Directive – Creates a custom component composed of a View and a Controller. You can use it as a custom HTML element. Also, the router can map routes to Components.
Decorator Directive – Decorates an existing HTML element with additional behavior. A classic example is ng-show.
Template Directive – Transforms HTML into a reusable template. The directive author can control when and how the template is instantiated and inserted into the DOM.
Examples include ng-if and ng-repeat.
As an Angular developer, Igor Minar made clear in ng-europe conference that ” It’s still early days and design is still evolving and changes can be seen in actual framework and we’re trying to consider all the options. Perhaps will come up with something new and amazing! “. Many developers are excited about the modern approach the Angular team is taking with 2.0, a few seem to be predicting high, and a few more are worried about what they should do.
Moreover, Angular team already announced that they will keep supporting and updating 1.3 for next few years and there will be migration path from Angular 1.3 to 2.0. Some of the people that are using AngularJS right now might say this upgrade that the framework is getting is a good thing, while some might say it’s a bad one. But how can you really judge a product that’s still in development phase? Things can completely change at any point of time, so it’s too early to make an opinion about it. We have to wait and see how things turn out to be in the end and then decide if the transition from AngularJS 1.3 to 2.0 is worth it.
One of the things that has come to prominence in the last few years is data visualization. These days there are many great tools for making excellent infographics. In fact there are new blogs on the topic almost every week. Gone are the days when people used to make simple charts with Paint, today infographics come with 3D text, exotic colors, maps, interactive features and superb artistry. Infographics has made data visualization a lot more fun. Even the most basic excel data can now be made visually exciting.
Tools in Market:
For a beginner who does not have much info on data visualization tools, google chart API offers many static charts that are supported on manybrowsers. These infographics are okay for the beginner who does not mind Google look and does not require individualization or a personal look. For those who want bar charts and line graphs one may want to look at Flot. However, because Flot is a jQuery library, you will need to be familiar with jQuery in order to manipulate the graphics.
There are many other great data visualization tools which can help people create graphs and charts. These include Raphael, D3, and Visual.ly. If you want interactive GUI controls, go for Crossfilter, Tangle, Modest Maps, Leaflet, Polymaps, Openlayers, CartoDB and Nodebox.For those who are already competent programmers and want something even more elegant than EXCEL for data visualization, go with R, Weka and Gephi.
These are just some of the newer data visualization tools available that require a different set of skills. The biggest mistake most people make when preparing data for visualization is choosing the wrong tool. Excel isn’t graphically flexible, but it is a good way to explore data. It is limited to default set of colours, lines and styles make it difficult to create graphics. One needs to learn the right skills to create superb data visualization. More important than learning how to draw, one must become versatile with the functional tools in each program so that they can maximize its use. For those who love interactive data visualization, use CSS, HTML and JavaScript/jQuery to create the interactivity. No matter what you select to make your data impressive, good visualization requires a lot of practice.
Cyberspace is a jungle and it is easy to get lost on how to improve data visualization. There are far too many tools and little guidance as to what to use and what not to use. Fly by night graphics companies charge exorbitant sums of money and most people are left with introductory seminars and programs and no one to turn to when the companies disappear.
Data Visualization under UI Radar:
The field of data visualization is expanding rapidly and for those who are interested in using a tool to amplify their data, it is important to know that there is no tool that will make you a PRO overnight. You must have a sense of creativity and analytical skill and if you have that, you can be a success with any tool. Too many people try to make enhanced visualizations but they lack knowledge of which graph to use. Buying the most expensive program for making data visualization does not make you great- if you have no creativity, then nothing will make your data appealing.
How to go about it?
If you know how to code, then its increases your potential to make data visualization to another level. Writing codes allows you to become versatile and add more complexities. You will be on another planet if you are a programmer. But do not get me wrong; not being a programmer does not mean that you cannot enhance data visualization. There are many graphics programs that are easy to learn even if you do not know the first thing about coding.
There are so many tools, take some time and learn what some of them can do and cannot do. Know what you want and then select the best tool. Use a tool that you feel comfortable with.
Once you become familiar with the tool, you can deal with all the complexities. If you learn how to use a tool to make data appealing, then you can get better insights.
Do not go to YouTube and use a tool that everyone is using. Use a tool that fits your need and see what it can do for you. You have to love the tool you use. If you do not like a tool, there is little chance of you becoming creative and your data visualization will WORSEN.
How to choose a correct tool?
Choosing the right data visualization tools will require the exercise of a sound judgment on whether it can address your data analytics needs. More advanced tools like Tableau, Qlikview, Custom View and myriad others have allowed users to create very interactive and imaginative ways to visually represent information. They all have promising features but you should be able to look for a tool that can provide you features like animation, personalization, dynamic data management, and multi-dimensional visualization that can adapt to the changing course of data influx to your business. These essential features from a data visualization tool can help you plot your data for better clarity and efficient data analysis.
Top benefits of data visualization with rich UI are.
To be a successful UI developer in today’s world there are a few things that every aspiring developer should probably take into consideration. From problem-solving skills to a efficiency in HTML and CSS, this article will explore the seven basic skills every UI developer either has or is working towards developing.
PROBLEM-SOLVING SKILLS
UI developers should have exceptional problem-solving skills. In the world of coding, programming and web design; UI developers see lots of things in the project that go wrong. It is important that UI developers hone their abilities to solve problems quickly and efficiently in order to solve any type of issue they may face. They should have analytical and logical thought process. When problems are bit more complex or require some work to solve, they should be able to comprehend requirements, analysis, understand and fix them in a short time duration. Solving problems can be amazing learning experiences and will make developers even better at whatever they do.
CODING AND APPLICATION DESIGN PROGRAMS
Every UI developer should have proficient or advanced knowledge in the following tools and technologies – HTML, Graphic design knowledge, CSS, javascript, Jquery, Adobe Photoshop, and CMS (like wordpress /Adobe CQ5). Again these are not all the programs a typical UI developer may know, but they would set you off to a great start. Aspiring UI developers who are not proficient in these programs should master these skills before thinking about moving forward. Typical UI duties on the job would require knowledge of these, as they are important for the overall look, feel, and behaviour of a product or a design.
COMMUNICATION
Communication skills may be just as important as problem-solving skills. It is very useful to avoid requirement mismatch or communication gap errors. If a UI developer is able to communicate through a wide range of mediums, orally, written, through animation, or through coding, whatever that medium may be its vital that aspiring UI developers know how to communicate effectively using it. As always communicating effectively is not just about being able to confidently express your ideas or issues about a certain product. It’s also about being completely receptive to criticism and feedback and using it as a tool of motivation to improve upon your skills and overall yourself.
RESEARCHING SKILLS
UI developers typically should have a solid set of researching skills in their back pockets. Researching and understanding users is something UI developers frequently do while working on a product or design. Creating an accessible application is not just the responsibility of developers. Rather, they need to keep an eye on new techniques, frame works, and tools to improve the application. They should be able to quickly experiment a new framework by creating a POC (Proof of concept) to see if such new framework/library fits their application. This helps UI developers focus on the key development issues to get the details of application improvement & scalability.
COLLABORATION
Collaboration skills are the next set that are crucially important for all those aspiring to be a great UI developer. At times UI designing can be incredibly challenging and is difficult, if they have no support. Collaborating with others, whether it be co-workers or other established UI designers at other companies, can be a significant help to UI developers to do the job better or faster than a lone worker. Collaborating with backend team or any other cross functional teams is turning out to be a key part of UI developer job duties. Improves project team morale, spirit and enthusiasm. Happy workers are more productive As developers collaborate, they get to know each other better, and they gain a better understanding of individual working style which saves time and energy. It also allows them to solve problems together, thus speeding the process of finishing a task.
HUMAN FACTOR & EYE FOR DESIGN.
This is a basic skill that every aspiring UI developer should have. There are many human factors that should be considered for the design of a successful user interface websites in terms of development factors, visibility factors and acceptance factors. Here is the list of things that must be taken into consideration: human abilities, clear conceptual model, navigation, page layout, typography, headings, links, text appearance, color and texture, images, animation, audio and video effects etc. By taking care of these characteristics, UI developers can effectively improve the performance of the website. Ease of information presentation by reducing number of clicks will effectively help increase the site productivity, while maintaining a consistent, appealing brand image.
PORTFOLIO
As a UI developer or designer, portfolio is an essential piece to show up actual samples of their work. It’s an opportunity to demonstrate a curated selection of their best pieces of work. If done right, UI-developers portfolio will give a huge advantage among rest of applicants. This allows employers and client’s know more about UI developers work ing standard and quality of their work. Overall, the portfolio should reflect UI developers professionalism and creativity to capture viewers attention.
These are the few findings that a UI developer should at least be aware of when programming user interfaces. Thus, creating a good User Interface is a preplanned, well-determined, usercentric and purposeful process which needs keen attention to place everything right. Many developers have seen tremendous benefit particularly in development time savings and reduced UI defects. This will help UI-developers to effectively set them off on the right path.
What’s the correct way to communicate between controllers in AngularJS?
The two best ways to communicate between controllers in Angular JS are:
a) $broadcast
b) $emit
$emit, $broadcast and $on all these methods come under the common “publish/subscribe” design pattern.If an event is fired up the $scope, it is because of $scope.$emit. If an event is fired down the $scope, it is because of $scope.$broadcast. If we want to listen for these events, then we use $scope.$on.
We need not fire events on $rootScope, unless and until we need each and every single scope in the application to be notified about the event, So accordingly, $broadcast method is fired on our own scope only if it required for the children scopes. And if it is required for parent scopes, then $emit is fired on your own scope.
What is “use strict”;? what are the advantages and disadvantages to using it?
This statement indicates that the code should be executed in “strict mode”. It is only declared at the beginning of a function/script.Strict mode will help save developers from errors they didn’t even know that existed in their code.
Advantages:
i) It will catch common coding errors, which will throw exceptions.
ii) When vulnerable actions are performed, it throws errors.
iii) It will show,let us know and disable the features that are poorly coded.
Disadvantages:
i) It will not allow us to use the “with” statement. This statement will causes security and performance problems.
ii) It will not allow us to use the “arguments.caller” property, due to security concernsWe do not have an alternate to this property, but we can hard code an additional parameter.

 By default the color of the placeholder is black (with some opacity).