Why do people use Heroku when AWS is present? What distinguishes Heroku from AWS?
AWS / Heroku are both free for small hobby projects (to start with).
If you want to start an app right away, without much customization of the architecture, then choose Heroku.
If you want to focus on the architecture and to be able to use different web servers, then choose AWS. AWS is more time-consuming based on what service/product you choose, but can be worth it. AWS also comes with many plugin services and products.
Heroku
Platform as a Service (PAAS)
Good documentation
Has built-in tools and architecture.
Limited control over architecture while designing app.
Deployment is taken care of (automatic via GitHub or manual via git commands or CLI).
Not time consuming.
AWS
Infrastructure as a Service (IAAS)
Versatile – has many products such as EC2, LAMBDA, EMR, etc.
Can use a Dedicated instance for more control over the architecture, such as choosing the OS, software version, etc. There’s more than one backend layers.
Elastic Beanstalk is a feature similar to Heroku’s PAAS.
Can use the automated deployment, or roll your own.
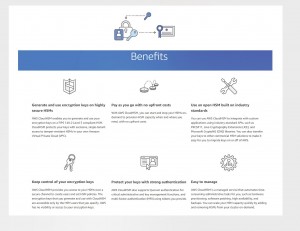
What is AWS Cloud HSM, how it works and what are the benefits?
AWS CloudHSM is a cloud-based hardware security module (HSM) that enables you to easily generate and use your own encryption keys on the AWS Cloud. With CloudHSM, you can manage your own encryption keys using FIPS 140-2 Level 3 validated HSMs. CloudHSM offers you the flexibility to integrate with your applications using industry-standard APIs, such as PKCS#11, Java Cryptography Extensions (JCE), and Microsoft CryptoNG (CNG) libraries. CloudHSM is also standards-compliant and enables you to export all of your keys to most other commercially-available HSMs. It is a fully-managed service that automates time-consuming administrative tasks for you, such as hardware provisioning, software patching, high-availability, and backups. CloudHSM also enables you to scale quickly by adding and removing HSM capacity on-demand, with no up-front costs.
There is a new feature in Docker 1.13.x called Docker container prune: This will do what you want and will work on all platforms the same way.
There is also a Docker system prune, which will clean up containers, images, volumes, and networks all in one command.
Command:
Here is an example on how to clean up old containers that are weeks old:
$ docker ps –filter “status=exited” | grep ‘weeks ago’ | awk ‘{print $1}’ | xargs –no-run-if-empty docker rm
There are a lot of AWS customers who run Kubernetes on AWS. In fact, according to the publishes, 63% of Kubernetes workloads run on AWS. While AWS is a popular place to run Kubernetes, there is still a lot of manual configuration that customers need to manage their Kubernetes clusters. The user has to install and operate the Kubernetes master and configure a cluster of Kubernetes workers. In order to achieve high availability in Kubernetes clusters, the user has to run at least three Kubernetes masters across different AZs. Each master needs to be configured, consistently share information, load balance, and fail-over to the other masters if one experiences a failure. Then once the user has all set up, the user still has to deal with upgrades and patches of the masters and workers software. Explore this article and know more about AWS ECS Kubernetes release.
ABOUT AMAZON EKS
Amazon Elastic Container Service for Kubernetes (Amazon EKS) is a completely managed service that makes it easy for the user to use Kubernetes on AWS without having to be a proficient in managing Kubernetes clusters. There are few points that developers will really like about this service. Firstly, Amazon EKS runs the upstream version of the open-source Kubernetes software, so the user can use all the standing plugins and tooling from the Kubernetes community. The users can easily migrate their Kubernetes applications to Amazon EKS with zero code changes. Secondly, Amazon EKS spontaneously runs K8s with three masters across three AZs to protect against a single point of failure. This multi-AZ architecture provides resiliency against the loss of an AWS Availability Zone.
Thirdly, Amazon EKS also automatically detects and replaces unhealthy masters, and it provides automatic version upgrades and patching for the masters. The Amazon EKS joins with Amazon features like Elastic Load Balancing for load distribution, IAM for authentication, Amazon VPC for isolation, and AWS Cloud Trail for logging.
HOW IT ACTUALLY WORKS
Amazon EKS integrates IAM authentication with Kubernetes RBAC in association with Heptio. The user can assign RBAC roles to every individual IAM entity allowing the user to control the access authorizations to their Kubernetes masters. This allows the users to easily manage their Kubernetes clusters using Kubernetes tools such as Kubectl.
The user can also use a private link if he/she wants to access their Kubernetes masters directly from their Amazon virtual private cloud. This process lets the users access their Kubernetes masters and Amazon EKS straight from their own Amazon VPC without using public IP address.
Lastly, an open source CNI plugin that anyone can use with their Kubernetes clusters on AWS. This allows the user to natively use Amazon VPC networking with their Kubernetes pods. With Amazon EKS, introducing a Kubernetes cluster is as easy as a few clicks in the AWS Management Console. Amazon EKS handles the rest, the improvements, fixing, and high availability.
AWS Greengrass is a software that extends AWS cloud capabilities to local devices, making it possible to collect and analyze data closer to the source of information, while also steadily communicating with each other on local networks. More precisely, developers who use AWS Greengrass can author server less code in the cloud and conveniently deploy it to devices for local execution of applications.
When Andy Jassy announced the release of AWS Greengrass in Limited Preview back in November at AWS reinvent 2016, the show floor was vibrant for hours. AWS Greengrass promises to power up what “the Edge” by allowing connected devices to run local compute, messaging, data caching, and synch capabilities securely, even when they are not connected to the Internet.
And while connectivity stands at the core of IoT, if the user is developing or deploying connected devices the user cannot always count on a steady connection. AWS Greengrass also lets one device act as a hub for others, so they can save energy by keeping data connections with a local intranet.
The latest announcement of general availability for AWS Greengrass is a big deal for IoT developers. It is a one of the important new component in the Cloud toolkit that powers IoT, and gives us few things to consider.
KEY TAKEOUT’S FROM AWS GREENGRASS ANNOUNCEMENT SOFTWARE SKILLS ARE NOW PORTABLE TO IOT
Greengrass moving more of what software developers do to the edge of the network is a major inflection point.
The enormous software developer community is already moving into IoT, and tools like AWS Greengrass will help to rule the space over time. Their familiarity with programming in languages such as Python and writing lambdas to process streaming data in-flow now becomes applicable on the other side of the “choke point.”
CONNECTIVITY IS MORE IMPORTANT
When it comes to connectivity, IoT developers need solutions that are simple, reliable, and flexible.
Existing product offerings rarely deliver on all three, and often burden projects with significant commercial and technical constraints even during development and testing. Signing complicated contracts in the prototype stage, when there is no guarantee that devices will even work as designed, can still require a years-long upfront commitment.
EFFICIENCY MATTERS
The communication between a device and the cloud comes with the burden of retransmitting repetitive, undifferentiated data related to security, encryption, and packet headers.
A significant portion of IoT cellular opex is 25% to as much as 75% or more in many cases it is related directly to this overhead or “connectivity tax.”
Both are highly preferable for the performance and a cost perspective to transmit only the meaningful data.
THE TOTAL PACKAGE FOR IOT
Device-based environments such as AWS Greengrass promise a new, easier IoT featuring:
Familiar development tools.
Pre-processing on constrained devices.
Decreased cellular data connectivity (or newer variants such as RPMA, NB-IoT, CAT-M).
A flexible, take-what-you-need, pay-as-you-go fee structure.
If you are around DevOps or people who are working with deployments in your industry, then you must have heard of the name blue green deployment. Most of the organizations in the world use this technique to get the minimum down time for their respective products. This deployment is old but still one of the finest to use. So, explore this article and know what actually is blue green deployment.
WHAT EXACTLY IS THE BLUE-GREEN DEPLOYMENT
A blue-green deployment is a change management strategy for releasing software code. Blue/green deployment is also referred as A/B deployments which require two identical hardware environments that are configured exactly the same way. While one environment is active and serving end users, the other environment remains idle.
Blue-green deployments are often used for consumer-facing applications and applications with a serious uptime requirement. New code is released to the inactive environment, where it is thoroughly tested. Once the code has been assessed, the team makes the idle environment active, typically by adjusting a router configuration to redirect application program traffic. The process gets reversed when the next software iteration is ready for release.
THE STEP-BY-STEP PROCESS OF BLUE-GREEN DEPLOYMENT
To demonstrate this concept, first the user needs to set up two server environments. Each will have a web server installed. In this example, the web server represents an entire application stack which could include a load balancer, multiple web servers, and distributed or replicated databases in the backend. In this example the user has used a web server because it represents the smallest environment that can demonstrate the release pattern.
CREATE A LOCAL APPLICATION
We will start by creating “application”. This is an index page that the web servers can display. It allows the user to demonstrate different “versions” of the app without the overhead of actual development. On local system, install git using the platform’s preferred method. If the user’s local machine is running Ubuntu, then the user can install by typing,
local$ sudo apt-get update
local$ sudo apt-get install git
The user need to set a few configuration settings in order to commit to a git repository. The user can give name and email address by typing:
With the configuration set, the user can create a directory for their new application and move into it:
local$ mkdir ~/sample_app
local$ cd ~/sample_app
Initialize a git repository in our application directory by typing:
local$ git init
Now, create the index.html file that represents the application:
local$ nano index.html
Save and close the file when it is finished.
To finish up, the user can add the index.html file to the git staging area and then commit by typing:
local$ git add .
local$ git commit -m “initializing repository with version 1″
CONFIGURE THE BLUE AND GREEN WEB SERVERS
Next, work on setting up green and blue environments with functional web servers. Log into your servers with your sudo user to get started.
HOW DOES BLUE GREEN DEPLOYMENT WORK WITH AWS?
DNS routing is a common method for Blue Green deployments. With DNS the user can easily switch traffic from the blue environment to the green and vice versa if the rollback is needed. Route 53 can be used to implement switch when bringing up the new “green” environment. The switch could consist of a single EC2 instance, or an entire ELB. The resource record set has to be updated so that it points to the domain or subdomain of the new instance or the new ELB. It works for a varied variety of environment configurations, as long as the endpoint is a DNS service or an IP address.
As a substitute to this DNS approach, the user can also use Route 53 with designated resource record sets. The traffic can be switched from blue environment to the green environment by updating the designated record of the record set. The user can easily rollback to blue deployment in case of an error by updating the DNS record.
Another approach to perform the Blue Green switch is using the weighted distribution with Route 53. Here the user can shift the traffic based on weightage of environment. Amazon Route 53 enables the user to define a percentage of traffic for the green environment and gradually update the weights until the green environment carries the full production traffic. This method provides the ability to perform canary analysis that slowly introduces a small percentage of production traffic to the new environment.
AWS offers several methods to cost-effectively deliver live video content on the cloud. This answer provides an AWS solution that combines AWS Elemental Cloud, a service that enables customers to rapidly deploy multiscreen offerings for live and on-demand content, with other AWS services to build a highly resilent and scalable architecture that delivers your live content worldwide.
AWS is providing a range of services to help the user to develop mobile applications that can scale up to hundreds of millions of users and can reach global audiences. With AWS the user can get started quickly, it ensures high quality by testing on real devices in the cloud, and measures and improves the user engagement. So let’s dive deep and know what is AWS Mobile Hub and setting-up of a mobile hub.
What exactly the AWS Mobile Hub is :
AWS Mobile Hub provides an integrated console experience that enables the user to swiftly create and configure powerful mobile app backend features and integrate them into their mobile app. The user can create a project by selecting the features to add to their application.
When the user builds her project for iOS Objective-C, iOS Swift, or Android, Mobile Hub automatically provisions and configures all of the AWS service resources that the app’s features require. Mobile Hub then guides the user through integrating the features into the user app code and downloading a fully working quick start app project that demonstrates the features.
After the mobile app is built, the user can use Mobile Hub to test the app, then monitor and visualize how it is being used.
AWS Mobile Hub enables the user to select the region in which their project’s resources will be created.
When the user uses AWS Mobile Hub, the user can pay only for the underlying services that Mobile Hub provisions based on the features they have chosen in the Mobile Hub console.
Setting-up AWS Mobile Hub: Sign-up for AWS
To use AWS Mobile Hub, the user needs an account in AWS. The user account will have the access to all available services, but the users are charged only for the services they use. If the user is a new AWS customer, they can get started with the AWS Free Tier.
Creating an I am user
To provide better security, the user is recommended to not to use their AWS root account to access the Mobile Hub. Instead of that, the user can create an AWS Identity and can Access Management (IAM) user, or can use an existing IAM user, in their AWS account and then access Mobile Hub. If the user has already signed up for AWS but has not created an IAM user for themselves, they can create one by using the IAM console. First, they have to create an IAM administrator group, then create and assign a new IAM user to that group.
Enabling AWS Mobile Hub
AWS Mobile Hub administers AWS resources for mobile app projects on behalf of the customer. This includes the automation that creates AWS Identity and Access Management roles to the mobile app users and updates their permissions based on the features that are enabled in a mobile app project. Because these operations require administrative privileges, then only a user with administrative privileges may enable to Mobile Hub too. These are the steps an administrative user must take in order to enable AWS Mobile Hub in an AWS account. This only needs to be done once.
To enable Mobile Hub in an AWS account:
Navigate to the AWS Mobile Hub console at https://console.aws.amazon.com/mobilehub/.
Select Get Started.
Select Yes, grant permissions.
Signing in to Mobile Hub and Creating the user’s Project:
A Mobile Hub project is a logical workspace which contains the features which the user chooses to incorporate into their mobile app. The user can create as many projects as they wish.
To create a Mobile Hub project
Select Get Started or Create new project.
For Project name, type a name for the project.
Select Create project.
Getting Started: App Content Delivery:
The App Content Delivery feature enables the user to store app assets, such as resource or media files, so that a user can download and cache them within their app. Mobile Hub offers two choices for distributing these files: 1. from a single location using an Amazon S3bucket or 2.
distributed through a global content delivery network by using Amazon CloudFront.
Cloud Logic
The Cloud Logic feature lets the user to build backend services using AWS Lambda functions that the user can call from their mobile app. Using Cloud Logic, a user can run code in the cloud to process business logic for their apps and share the same code for both iOS and Android apps. The Cloud logic feature is powered by AWS Lambda functions, which allows the user to write code without worrying about managing frameworks and scaling backend infrastructure.
Push Notifications
The Push Notifications feature enables the user to send push notification messages to their iOS and Android apps using Amazon Simple Notification Service. The user can integrate with Apple and Google messaging services by providing credentials that are provided by those services. They can send messages directly to individual devices, or publish messages to the SNS topics.
User Data Storage
The Mobile Hub User Data Storage feature, creates and configures four folders for each user, inside an Amazon S3 bucket belonging to the app. The following table shows the details of permission policies that are provisioned for each folder type.
The Verdict
With Mobile Hub and the creations of a Mobile Hub project, Mobile Hub allows the user to return and modify its features and configurations. With all these features available, combined with AWS services, client SDKs, and code makes it fast and easy to add new capabilities to the user mobile App. With the fast turnaround of information, whether it is social, media or business, AWS Mobile Hub provides an ideal platform for mobile apps and services to work seamlessly together.
AWS Lambda is a compute service that lets the user to run the code without provisioning or managing servers. AWS Lambda executes the code only when it is needed and scales automatically. The user pays only for the compute time that they consume – there is no charge when the user doesn’t run the code. With AWS Lambda, one can run code virtually for any type of application or backend services. AWS Lambda runs the code on a high-availability compute infrastructure and performs all the administration of the compute resources, such as server and operating system maintenance, capacity provisioning and automatic scaling, code monitoring, and logging. The user need to do is to supply the code in one of the languages that AWS Lambda supports (such as Node.js, Java, C#, and Python).
The user can use AWS Lambda to run the code in response to events, such as changes to data in an Amazon S3 bucket or an Amazon DynamoDB table to run the code in response to HTTP requests using Amazon API Gateway or to invoke the user’s code using API calls made using AWS SDKs. With the above capabilities, the user can use Lambda to easily build data processing triggers for AWS services like Amazon S3 and Amazon DynamoDB process streaming the data which is stored in Amazon Kinesis or the user can create their own back end which operates at AWS scale, performance, and security.
AWS LAMBDA– RUNS JAVA CODE IN RESPONSE TO EVENTS
Many of the AWS users are using AWS Lambda to build clean and straightforward applications which handles image and document uploads, process log files from AWS CloudTrail, and handles the data which is streamed from Amazon Kinesis, and so forth. With the newly launched synchronous invocation capability, Lambda is becoming the most favourite choice for building mobile, web, and IoT backends.
LAMBDA FUNCTION IN JAVA
AWS Lambda has become even more useful by giving the ability to write the user’s Lambda functions in Java.
The user’s code can make use of Java 8 features along with any desired Java libraries. The user can also use the AWS SDK for Java to make calls to the AWS APIs.
AWS is providing two libraries specific to Lambda: aws-lambda-java-core with interfaces for Lambda function handlers and the context object, and aws-lambda-java-events containing type definitions for AWS event sources (Amazon Simple Storage Service (S3), Amazon Simple Notification Service (SNS), Amazon DynamoDB, Amazon Kinesis, and Amazon Cognito). User can author their Lambda functions in one of the two ways. Firstly, they can use a high-level model that uses input and output objects:
public lambdaHandler( input, Context context) throws IOException;
public lambdaHandler( input) throws IOException;
If the user does not want to use POJOs or if Lambda’s serialization model does not meet the user’s needs, they can use the Stream model. This is a bit lower-level:
public void lambdaHandler(InputStream input, OutputStream output, Context context)
throws IOException;
The class in which the Lambda function is defined should include a public zero-argument constructor, or to define the handler method as static. Alternatively, the user can also implement one of the handler interfaces(RequestHandler::handleRequest or RequestStreamHandler::handleRequest) which is available within the Lambda core Java library.
PACKAGING, DEPLOYING, AND UPLOADING
User can continue to use their existing development tools. In order to prepare their compiled code with Lambda, user must create a ZIP or JAR file that contains their compiled code (CLASS files) and any desired JAR files. The handler functions should be stored in the usual Java directory structure and the JAR files must be inside a lib subdirectory. In order to make this process easy, AWS has published build approaches using popular Java deployment tools such as Maven and Gradle.
Specify a runtime of “java8” when the user uploads their ZIP file. If they implement one of the handler interfaces, then they have to provide the class name. Otherwise, they have to provide the fully qualified method reference (e.g. com.mypackage.LambdaHandler::functionHandler).