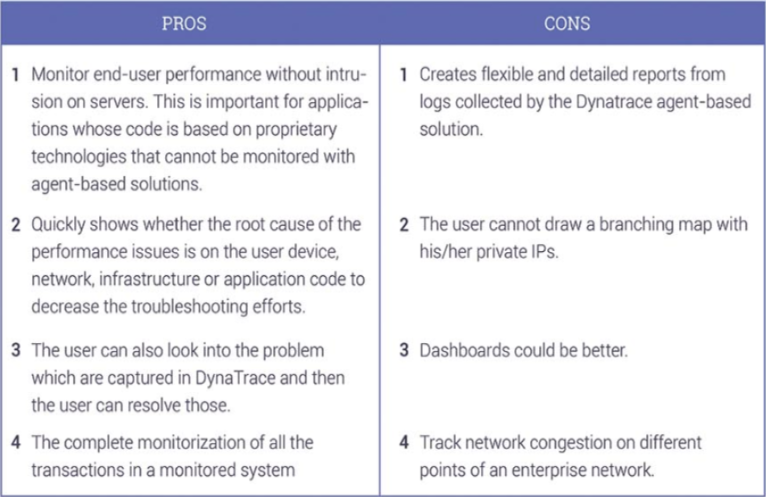
DynaTrace Software is an Application Performance Monitoring tool (APM), which is extensively used nowadays. It comes with advanced features for monitoring applications. Through which the user can without difficulty identify the performance of the application.
DynaTrace is used to discover the existence of defects in CPU performance, response time, transaction rate, throughput, and system usage. It will help the user to diagnose and fix many performance issues at an early stage and make the application more valuable.
HOW DOES IT WORK
DynaTrace server should be installed on the user’s system and it consists of host and agent. It will have a dashboard through which the user can diagnose the system in one place.
The server can easily interact with the agent if wanted, for that the user have to run the command through terminal and then can easily watch the interaction and also can alter the time.
Template literals are enclosed by the back-tick (` `)
Template literals can contain placeholders. These are indicated by the dollar sign and curly braces (${expression}). The expressions in the placeholders and the text between them get passed to a function.
In order to embed expressions within normal strings, you can use the following syntax:
var a = 5;
var b = 10;
console.log(‘Fifteen is ‘ + (a + b) + ‘ and\nnot ‘ + (2 * a + b) + ‘.’);
// “Fifteen is 15 and
// not 20.”
Now, with template literals, you are able to make use of the syntactic sugar making substitutions like this more readable:
var a = 5;
var b = 10;
console.log(`Fifteen is ${a + b} and
not ${2 * a + b}.`);
// “Fifteen is 15 and
// not 20.”
Nesting Templates:
In certain times, nesting a template is the easiest and perhaps more readable way to have configurable strings. Within a backticked template it is simple to allow inner backticks simply by using them inside a placeholder ${ } within the template. For instance, if condition a is true: then return this templated literal.
Explain in windows DNS server what is Primary, Secondary, and Stub zone?
In windows DNS server,
Primary Zone: In this, the file is saved as normal text file with filename (.dns).
Secondary Zone: It maintains a read-only copy of zone database on another DNS server. Also, it acts as a back-up server to the primary server by providing fault tolerance and load balancing.
Stub Zone: It consists of a copy of name server and SOA records which is used for reducing the DNS search orders.
Explain what is the difference between a thread and a computer process?
Computer Process: In computing, a process is an instance of a computer program that is executed sequentially by a computer system which can run several computer programs concurrently.
Thread: A thread is a several executable program that work together as a single process. For instance, one thread might send an error message to the user; another might handle error signals while the third thread might be executing the original action.
Page speed refers to how fast your site loads for a user, something Google takes into account while ranking websites since a faster loading page directly translate to better user experience. If the interviewer asks what you would do to increase page speed, describe how you’ve achieved this in the past with examples such as reducing image sizes, enabling compression, reducing redirects, removing render-blocking JavaScript, leveraging browser caching, improve server response time, using a content distribution network to compress files, optimizing the code etc.
The CSS Specificity is one of the most difficult concepts to grasp in Cascading Stylesheets. The different weight of selectors is usually the reason why CSS-rules don’t apply to some elements, although they should have.
Specificity determines, which CSS rule is applied by the browsers.
Every selector has its place in the specificity hierarchy.
If two selectors apply to the same element, the one with higher specificity wins.
There are four distinct categories which define the specificity level of a given selector: inline styles, IDs, classes, attributes, and elements.
How to measure specificity?
“Start at 0, add 1000 for style attribute, add 100 for each ID, add 10 for each attribute, class or pseudo-class, add 1 for each element name or pseudo-element. So in the specificity value would be 122 (0,1,2,2 or 0122): 100 for #content, 10 for .data, 10 for :hover, 1 for body and 1 for img.”
Flask is a small and powerful web framework for Python. It is easy to learn and simple to use, enabling the users to build their web app in less amount of time. Flask is also easy to get started with as a beginner because there is little boilerplate code for getting a simple app up and running. Flask backs extensions that can add application features as if they were implemented in Flask itself. Extensions exist for object-relational mappers, form validation, upload handling, and several common frameworks related tools. Extensions are updated more regularly than the core Flask program. Flask is commonly used with MongoDB which allows it more control over databases and history.
INSTALLING FLASK
Before getting started, the user need to install Flask. Because systems vary, things can intermittently go wrong during these steps.
INSTALL VIRTUALENV
Here we will be using virtualenv to install Flask. Virtualenv is a suitable tool that creates isolated Python development environments where the user can do all his/her development work. If the user installs it system-wide, there is the risk of messing up other libraries that the user might have installed already. Instead, use virtualenv to create a sandbox, where the user can install and use the library without affecting the rest of the system. The user can keep using sandbox for ongoing development work, or can simply delete it once the user is finished using it. Either way, the system remains organized and clutter-free.
If you see a version number, you are good to go and you can skip to this “Install Flask” section. If the command was not found, use easy_install or pip to install virtualenv. If you are running in Linux or Mac OS X, one of the following should work:
$ sudo easy_install virtualenv
$ sudo pip install virtualenv
If you are running Windows, follow the “Installation Instructions” on this page to get easy_install up and running on your system.
INSTALL FLASK
After installing virtualenv, the user can create a new isolated development environment, like so:
$ virtualenv flaskapp
Here, virtualenv creates a folder, flaskapp/, and sets up a clean copy of Python inside for the user to use. It also installs the handy package manager, pip.
Enter newly created development environment and activate it so to start working within it.
1
2
$ cd flaskapp
$ . bin/activate
Now, the user can safely install Flask:
$ pip install Flask
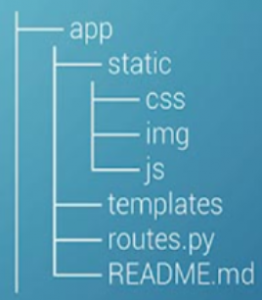
SETTING UP THE PROJECT STRUCTURE
Let’s create a couple of folders and files within flaskapp/ to keep the web app organized.
Within flaskapp/, create a folder, app/, to comprise all files. Inside app/, create a folder static/; this is where the user has to put the web app’s images, CSS, and JavaScript files, so create folders for each of those, as demonstrated above. As well, create another folder, templates/, to store the app’s web templates. Create an empty Python file routes.py for the application logic, such as URL routing.
And no project is complete without a helpful description, so create a README.md file as well.
BUILDING A HOME PAGE
While writing a web app with a couple of pages, it quickly becomes bothersome to write the same HTML boilerplate over and over again for each page. Also, if the user needs to add a new element to their application, such as a new CSS file, the user would have to go into every single page and should add. This is time consuming and error prone. Wouldn’t be nice if, instead of repeatedly writing the same HTML boilerplate, the user can define their page layout just once, and then use that layout to make new pages with their own content.
APP/TEMPLATES/HOME.HTML
1 {% extends “layout.html” %}
2 {% block content %}
3 <div class=”jumbo”>
4 <h2>Welcome to the Flask app<h2>
5 <h3>This is the home page for the Flask app<h3>
6 </div>
7 {% endblock %}
BUILDING AN ABOUT PAGE
In the above section, we have seen the creation of a web template home.html. Now, let’s repeat that process again to create an about page for our web app.
APP/TEMPLATES/ABOUT.HTML
{% extends “layout.html” %}
{% block content %}
<h2>About</h2>
<p>This is an About page for the Intro to Flask article. Don’t I look good? Oh stop, you’re making me blush.</p>
{% endblock %}
In order to visit this page in the browser, we need to map a URL to it. Open up routes.py and add another mapping:
JavaScript ES6 brings new syntax and amazing features to make the users code more up-to-date and readable. It allows the user to write less code and do more. ES6 introduces the user to many great features like arrow functions, template strings, class destruction, Modules, and much more. So, let’s dive deep in and study the new features on JavaScript ES6.
CONST & LET
Const is a new keyword in ES6 for declaring variables. const is more influential than var. Once it is used, the variable cannot be reassigned. In other words, it is an immutable variable except when it used with objects. This is really useful for targeting the selectors.
const a = 50;
a = 60; // shows error. You cannot change the value of const.
const b = “Constant variable”;
b = “Assigning new value”; // shows error.
LET
Let is similar to var but let has scope. Let is only accessible in the block level it is defined.
if (true) {
let a = 40;
console.log(a); //40
}
console.log(a); // undefined
In the above example variable ‘a’ is defined inside If statement and so it’s not accessible outside the function.
ARROW FUNCTIONS
The arrow function makes the users code more readable, more structured, and look like modern code.
// Old Syntax
function oldOne() {
console.log(“Hello World..!”);
}
// New Syntax
var newOne = () => {
console.log(“Hello World..!”);
}
The new syntax may be confusing a bit.
There are two parts of the syntax.
var newOne = ()
=> {}
The first part is declaring a variable and assigning the function () to it.
The second part is declaring the body part of the function. The arrow part with the curly braces defines the body part.
DEFAULT PARAMETERS
If you are familiar with other programming languages such as Ruby, Python then default parameters is not new to you.
Default parameters are parameters which are given by default while declaring a function. But the value can be changed when calling the function.
let Func = (a, b = 10) => {
return a + b;
}
Func(20); // 20 + 10 = 30
In the above example, we are passing only one parameter. The function makes use of the default parameter and executes the function.
MAPS
Map holds key-value pairs, it is similar to an array but we can define our own index and indexes are unique in maps. In maps, all indexes are unique and we can use any value as key or value.
var NewMap = new Map();
NewMap.set(‘name’, ‘John’);
NewMap.set(‘id’, 2345796);
NewMap.set(‘interest’, [‘js’, ‘ruby’, ‘python’]);
NewMap.get(‘name’); // John
NewMap.get(‘id’); // 2345796
NewMap.get(‘interest’); // [‘js’, ‘ruby’, ‘python’]
GETTERS AND SETTERS
Getters and setters are one of the useful feature introduced in ES6. It will come in handy if you are using classes in JS.
class People {
constructor(name) {
this.name = name;
}
getName() {
return this.name;
}
setName(name) {
this.name = name;
}
}
let person = new People(“Jon Snow”);
console.log(person.getName());
person.setName(“Dany”);
console.log(person.getName());
Output:
Jon Snow
Dany
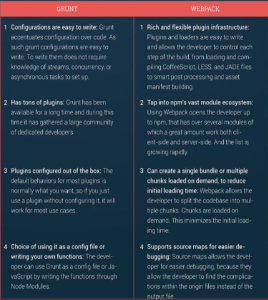
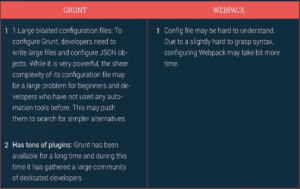
GruntJS is a command-line tool for front-end developers to run predefined repetitive tasks. Whereas, tasks are defined declaratively with configuration objects, which are controlled by plugins to keep the core package at a sufficient size. It is used to automate JavaScript workflows like concatenating and minifying JS files, carrying out tests, refreshing browser to upload script changes and much more.
WEBPACK
At first, Webpack is a module bundler, though it is quite often used instead of Grunt task runners. This advanced tool provides developers with control over how it splits the modules, allowing them to adjust builds to certain situations and workaround solutions that do not function properly out of the box.
Comparing Webpack vs Grunt, the first of those offers more flexibility and advanced functionality for modern front-end projects. It comes with a functional core and can be extended using specific loaders and plugins. Fundamentally it is used for bundling JavaScript modules with dependencies into files, but for difficult JavaScript applications with lots of non-code assets it can provide great benefits.
In this article we are going to explain the major differences between Grunt and Webpack and also the cons of each command-line tool.