
Python’s Flask

Flask is a small and powerful web framework for Python. It is easy to learn and simple to use, enabling the users to build their web app in less amount of time. Flask is also easy to get started with as a beginner because there is little boilerplate code for getting a simple app up and running. Flask backs extensions that can add application features as if they were implemented in Flask itself. Extensions exist for object-relational mappers, form validation, upload handling, and several common frameworks related tools. Extensions are updated more regularly than the core Flask program. Flask is commonly used with MongoDB which allows it more control over databases and history.
INSTALLING FLASK
Before getting started, the user need to install Flask. Because systems vary, things can intermittently go wrong during these steps.
INSTALL VIRTUALENV
Here we will be using virtualenv to install Flask. Virtualenv is a suitable tool that creates isolated Python development environments where the user can do all his/her development work. If the user installs it system-wide, there is the risk of messing up other libraries that the user might have installed already. Instead, use virtualenv to create a sandbox, where the user can install and use the library without affecting the rest of the system. The user can keep using sandbox for ongoing development work, or can simply delete it once the user is finished using it. Either way, the system remains organized and clutter-free.
If you see a version number, you are good to go and you can skip to this “Install Flask” section. If the command was not found, use easy_install or pip to install virtualenv. If you are running in Linux or Mac OS X, one of the following should work:
$ sudo easy_install virtualenv
$ sudo pip install virtualenv
If you are running Windows, follow the “Installation Instructions” on this page to get easy_install up and running on your system.
INSTALL FLASK
After installing virtualenv, the user can create a new isolated development environment, like so:
$ virtualenv flaskapp
Here, virtualenv creates a folder, flaskapp/, and sets up a clean copy of Python inside for the user to use. It also installs the handy package manager, pip.
Enter newly created development environment and activate it so to start working within it.
1
2
$ cd flaskapp
$ . bin/activate
Now, the user can safely install Flask:
$ pip install Flask
SETTING UP THE PROJECT STRUCTURE
Let’s create a couple of folders and files within flaskapp/ to keep the web app organized.
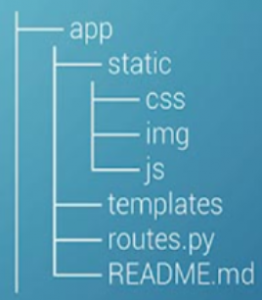
Within flaskapp/, create a folder, app/, to comprise all files. Inside app/, create a folder static/; this is where the user has to put the web app’s images, CSS, and JavaScript files, so create folders for each of those, as demonstrated above. As well, create another folder, templates/, to store the app’s web templates. Create an empty Python file routes.py for the application logic, such as URL routing.
And no project is complete without a helpful description, so create a README.md file as well.
BUILDING A HOME PAGE
While writing a web app with a couple of pages, it quickly becomes bothersome to write the same HTML boilerplate over and over again for each page. Also, if the user needs to add a new element to their application, such as a new CSS file, the user would have to go into every single page and should add. This is time consuming and error prone. Wouldn’t be nice if, instead of repeatedly writing the same HTML boilerplate, the user can define their page layout just once, and then use that layout to make new pages with their own content.
APP/TEMPLATES/HOME.HTML
1 {% extends “layout.html” %}
2 {% block content %}
3 <div class=”jumbo”>
4 <h2>Welcome to the Flask app<h2>
5 <h3>This is the home page for the Flask app<h3>
6 </div>
7 {% endblock %}
BUILDING AN ABOUT PAGE
In the above section, we have seen the creation of a web template home.html. Now, let’s repeat that process again to create an about page for our web app.
APP/TEMPLATES/ABOUT.HTML
{% extends “layout.html” %}
{% block content %}
<h2>About</h2>
<p>This is an About page for the Intro to Flask article. Don’t I look good? Oh stop, you’re making me blush.</p>
{% endblock %}
In order to visit this page in the browser, we need to map a URL to it. Open up routes.py and add another mapping:
from flask import Flask, render_template
app = Flask(__name__)
@app.route(‘/’)
def home():
return render_template(‘home.html’)
@app.route(‘/about’)
def about():
return render_template(‘about.html’)
if __name__ == ‘__main__':
app.run(debug=True)